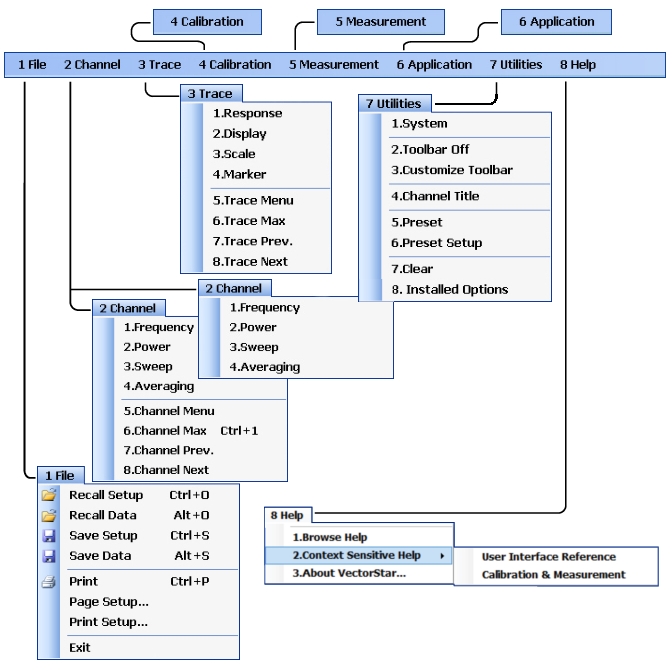
Menu Bar Drop-Down Menu Descriptions (1 of 11)
Menu and Command Name | Menu and Command Descriptions |
|---|
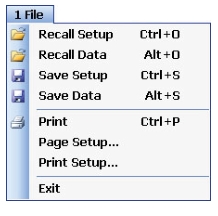
FILE Drop-Down Menu | • Front Panel Key: File • Keyboard: ALT + 1 • MENU BAR | File • MAIN | File | FILE |
Recall Setup Command | Select displays the RECALL SETUP dialog box and allows the recall of previously saved setup and/or calibration files:
– Active Channel Setup and Calibration (.chx) File
– Active Channel Setup (.stx) File
– All Channel Setup (.sta) File • Keyboard: CTRL + O (letter O) • MENU BAR | File | Recall Setup • MAIN | File | FILE | Recall Setup | RECALL SETUP Dialog Box |
Recall Data Command | Select displays the RECALL DATA dialog box and allows the recall of a previously saved active channel and/or active trace data file of these types:
– Active Channel S2P (.s2p) File
– Formatted Data into Active Trace (.tdf) File
– Unformatted Data into Active Trace (.tdu) File
– Formatted Data into Active Trace Memory (.tdf) File
– Unformatted Data into Active Trace Memory (.tdu) File • Keyboard: Keyboard: ALT + O (letter O) • MENU BAR | File | Recall Data • MAIN | File | FILE | Recall Data | RECALL DATA Dialog Box |
Save Setup Command | Select displays the Save Setup dialog box and allows the user to save the currently applied system presets configuration file. • Keyboard: CTRL + S • MENU BAR | File | Save Setup • MAIN | File | FILE | Save Setup | SAVE SETUP Dialog Box |
Save Data Command | Select displays the SAVE DATA (Active Channel .txt) dialog box. Use this dialog to save the current channel data file. • Keyboard: ALT + S • MENU BAR | File | Save Data • MAIN | File | FILE | Save Data | SAVE DATA Dialog Box |
Print Command | Select displays the Windows PRINT dialog box to print the current main display. • Keyboard: CTRL + P • MENU BAR | File | Print • MAIN | File | Print | PRINT Dialog Box |
Page Setup Command | Select displays the Windows PAGE SETUP dialog box with controls for: • Paper size • Paper source tray at printer • Orientation as Portrait or Landscape • Margins for Left, Right, Top, and Bottom |
Print Setup Command | Select displays the PRINT SETUP dialog box. The controls allow the print output to be customized as required. The following parameters can be set: Output Format – Select one of the following: • Bitmap with Page Setup • Graphical • Tabular Header Output: • Include Header – The header configuration set in the fields below can be included or left off print reports. Each field can be separately configured to be included or not. • Model – Provides an input field for model number information such as the DUT or VNA model. • Operator Name – Provides an input field for operator name or other identification. • Device ID – Provides an input field for the DUT identification. • Operator Comment – Provides a large free form input field for comments about the DUT or test. Logo Setup: • Include Logo – The logo set in the fields below can be included or left off print reports. • Select Logo Type – Anritsu – The default selection set an Anritsu logo or user defined logo in BMP graphics format. • Select Logo Type – User – If a user logo is selected, the graphic file must be copied onto the VectorStar VNA in a known location. Then use the Browse button to navigate to the logo file. |
Exit Command | Select displays a confirmation dialog box. Click OK to exit the VectorStar application and return to the Windows desktop. Click Cancel to remain in the VectorStar application. • MENU BAR | File | Exit |
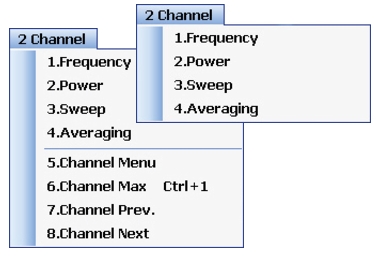
CHANNEL Drop-Down Menu | • CHANNEL menu for 25,000 point mode shown at left. • CHANNEL menu for 100,000 point mode short at right. • Front Panel Key: Channel • Keyboard: ALT + 2 • MENU BAR | Channel • MAIN | Channel | CHANNEL |
Frequency | Select displays the right-side FREQUENCY menu. • Front Panel Key: Frequency • Keyboard: ALT + 2 then 1 • MENU BAR | Channel | Frequency • MAIN | Frequency | FREQUENCY |
Power | Select displays the right-side POWER menu. • Front Panel Key: Power • Keyboard: ALT + 2 then 2 • MENU BAR | Channel | Power • MAIN | Power | POWER |
Sweep | Select displays the right-side SWEEP SETUP menu. • Front Panel Key: Sweep • Keyboard: ALT + 2, then 3 • MENU BAR | Channel | Sweep • MAIN | Sweep Setup | SWEEP SETUP |
Averaging | Select displays the right-side AVERAGING menu. • Front Panel Key: Avg (Average) • Keyboard: ALT + 2 then 4 • MENU BAR | Channel | Averaging • MAIN | Averaging | AVERAGING |
Channel Menu Command | Select displays the right-side CHANNEL menu. • Prerequisites: Instrument must be in 25,000 point mode. • Front Panel Key: Channel • Keyboard: ALT + 2, then 5 • MENU BAR | Channel | Channel Menu • MAIN | Channel | CHANNEL |
Channel Max Command | Select maximizes the display of the active channel. Select again returns to the previous multi-channel display. • Prerequisites: Instrument must be in 25,000 point mode. • Keyboard: ALT + 2, then 6 • Keyboard: CTRL + 1 • MENU BAR | Channel | Channel Max • MAIN | Channel | CHANNEL | Chan. Max |
Channel Previous Command | Selects the next lower channel number. If channel 1 was previously selected, selects the highest numbered channel. • Prerequisites: Instrument must be in 25,000 point mode. • Keyboard: ALT + 2, then 7 • MENU BAR | Channel | Channel Prev. • MAIN | Channel | CHANNEL | Chan. Previous |
Channel Next Command | Selects the next higher channel number. If the highest numbered channel was previously selected, selects channel 1. • Prerequisites: Instrument must be in 25,000 point mode. • Keyboard: ALT + 2, then 8 • MENU BAR | Channel | Channel Next • MAIN | Channel | CHANNEL | Chan. Next |
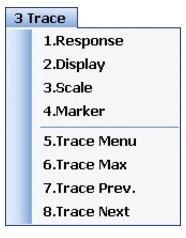
TRACE Drop-Down Menu | • Front Panel Key: Trace • Keyboard: ALT + 3 • MENU BAR | Trace • MAIN | Trace | TRACE |
Response Command | Select displays the right-side RESPONSE menu. • Front Panel Key: Response • Keyboard: ALT + 3 then 1 • MENU BAR | Trace | Response • MAIN | Response | RESPONSE |
Display Command | Select displays the right-side DISPLAY menu. • Front Panel Key: Display • Keyboard: ALT + 3, then 2 • MENU BAR | Trace | Display • MAIN | Display | DISPLAY |
Scale Command | Select displays the right-side SCALE menu. The name of the SCALE menu (and the buttons on it) depend on the display type selected such as:
– Scale (Log Mag)
– Scale (Lin Mag)
– Scale (Phase)
– Scale (Real)
– Scale (Imag)
– Scale (SWR) • Front Panel Key: Scale • Keyboard: ALT + 3, then 3 • MENU BAR | Trace | Scale • MAIN | Scale | SCALE |
Marker Command | Select displays the right-side MARKERS [1] menu. • Front Panel Key: Marker • Keyboard: ALT + 3, then 4 • MENU BAR | Trace | Marker • MAIN | Marker | MARKER [1] |
Trace Menu Command | Select displays the right-side TRACE menu. • Front Panel Key: Trace • Keyboard: ALT + 3, then 5 • MENU BAR | Trace | Trace Menu • MAIN | Trace | TRACE |
Trace Max Command | Select maximizes the active trace to full screen display. Selecting again, returns the trace to the standard multi-trace display. • Keyboard: ALT + 3, then 6 • MENU BAR | Trace | Trace Max • MAIN | Trace | TRACE | Trace Max |
Trace Previous Command | Selects the next lower trace number on the active channel. If Trace 1 is currently selected, the highest numbered trace is selected. If the current trace is not maximized, the previous trace will not be maximized. If the current trace is maximized, the previous trace will be maximized. • Keyboard: ALT + 3, then 7 • MENU BAR | Trace | Trace Prev. • MAIN | Trace | TRACE | Trace Previous |
Trace Next Command | Selects the next higher trace number on the active channel. If the highest numbered trace is currently displayed, the Trace 1 is displayed. If the current trace is not maximized, the next trace will not be maximized. If the current trace is maximized, the next trace will be maximized. • Keyboard: ALT + 3, then 8 • MENU BAR | Trace | Trace Next • MAIN | Trace | TRACE | Trace Previous |
CALIBRATION Drop-Down Menu | The CALIBRATION drop-down menu has one command that selects the right-side CALIBRATION menu • Front Panel Key: Calibration • Keyboard: ALT + 4 • MENU BAR | Calibration • MAIN | Calibration | CALIBRATION |
MEASUREMENT Drop-Down Menu | Select displays the right-side MEASUREMENT menu. • Front Panel Key: Measurement • Keyboard: ALT + 5 • MENU BAR | Measurement • MAIN | Measurement | MEASUREMENT |
APPLICATION Drop-Down Menu | The APPLICATION menu/command selects the right-side APPLICATION menu. • Front Panel Key: Application • Keyboard: ALT + 6 • MENU BAR | Application • MAIN | Application | APPLICATION |
UTILITY Drop-Down Menu | f 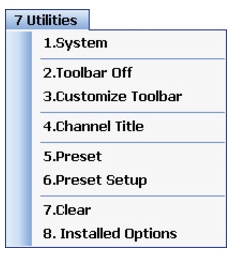 • Keyboard: ALT + 7 • MENU BAR | Utilities |
System
Command | Select displays the right-side SYSTEM menu. • Front Panel Key: System • Keyboard: ALT + 7, then 1 • MENU BAR | Utilities | System • MAIN | System | SYSTEM |
Toolbar Off
Command | Toggles the ICON TOOLBAR, immediately below the MENU BAR, on and off. • Keyboard: ALT + 7, then 2 • MENU BAR | Utilities | Toolbar Off |
Customize Toolbar
Command | Select displays the CUSTOMIZE TOOLBAR dialog box and allows the user to select which icons are to be displayed in the toolbar. Up to 10 icons can be displayed at one time and there are a total of 32 available icons. The Icon Toolbar configuration is saved when a Preset Save is completed. • Keyboard: ALT + 7, then 3 • MENU BAR | Utilities | Customize Toolbar |
Channel Title
Command | Select displays the DISPLAY SETUP menu and allows a user-defined title to be applied to and displayed above the active channel. Each channel can have a different or the same title. • Keyboard: ALT + 7, then 4 • MENU BAR | Utilities | Channel Title • MAIN | Display | DISPLAY | Display Area Setup | DISPLAY SETUP | Edit Chan. Title | EDIT CHANNEL TITLE Dialog Box |
Preset
Command | • Returns the instrument to its prior saved state which can be either the factory-default preset, or a user-defined setup. The PRESET SETUP menu selection defines which is used. • Front Panel Key: Preset • Keyboard: ALT + 7, then 5 • MENU BAR | Utilities | Preset • No right-side menu available to preset the instrument:
– Use either the Front Panel Preset Key or the Menu Bar Function above. • Navigation to the PRESET SETUP:
MAIN | System | SYSTEM | Setup | SETUP | Preset Setup | PRESET SETUP |
Preset Setup
Command | Select displays the PRESET SETUP menu which allows the user to customize whether the preset function restores the instrument to:
– User Defined: A previously saved user-defined state.
– Default: The factory as-shipped state.
– Default 0: The factory original setting. • Keyboard: ALT + 7, then 6 • MENU BAR | Utilities | Preset Setup • MAIN | System | SYSTEM | Setup | SETUP | Preset Setup | PRESET SETUP |
Clear Command | Select toggles the displayed right-side menu off and on. When toggled back on, the previously selected menu is displayed. For example, if the CALIBRATE function menu was displayed when the display was cleared, the CALIBRATE function menu is again displayed when Clear is selected a second time. • Keyboard: ALT + 7, then 7 • MENU BAR | Utilities | Clear Command |
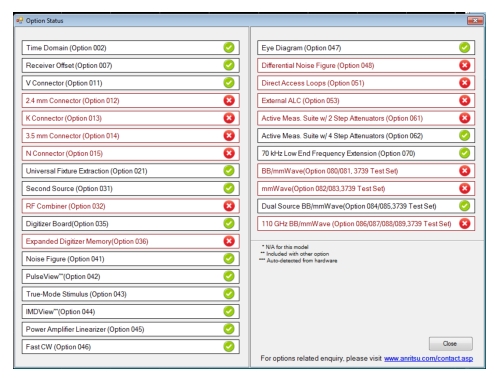
Installed Option Command | Select displays the OPTION STATUS dialog box (with a typical display shown below) that lists all installed, included, and not installed instrument options. Click Close to clear. • Keyboard: ALT + 7, then 8 • MENU BAR | Utilities | Installed Options • MAIN | System | SYSTEM | Setup | SETUP | Misc. Setup | MISC. SETUP | Installed Options | OPTION STATUS Dialog Box |
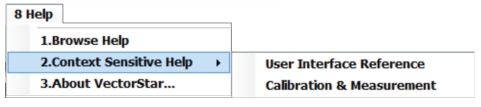
HELP Drop-Down Menu | • Front Panel Key: Help • Keyboard: ALT + 8 • MENU BAR | Help Selecting User Interface Reference takes the user to the section in the User Interface Reference Manual that is relevant to the current menu selected on the UI, where all details of the active menu and any related dialog boxes are explained. Selecting Calibration & Measurement takes the user to the chapter landing page in the Measurement Guide that is relevant to the current menu selected on the UI. From there, the user can select the appropriate link on the landing page to take them to the section in the manual that discusses calibration or measurement topics that are related to the active menu. Note that when the active menu is not directly related to any calibration or measurement operations, Help takes the user to the Measurement Guide Cover page and contents bar for further browsing (if desired), or the user can switch back the User Interface Reference for more information about the menu. |
Browse Help Command | Select displays the Help System, typically showing the help system table of contents and topics as an HTML page. The Help System navigation comprises the following main controls: Contents Tab – The initial display is with Closed Book icons. Click the Closed Book icon to open it. An Open Book icon appears, listing its Content Topics below the icon. If a single-column topic appears without the left-side navigation functions, click the Show Navigation button to show the left-side navigation and search functions. Any topic can be saved to the Favorites Listing (described below) for rapid access. Click the top-right Printer icon to print the topic to an attached local or network printer. Search Tab – The Search tab provides a search field for user entry of a keyword, phrase, or topic. Enter the term in the search field and click Go!. The search results appear in left-side Rank Title listing as Topic Links. Click a Topic Link of interest and the Topic appears in the in the right-side window with the search term highlighted. • Keyboard: ALT + 8, then 1 • MENU BAR | Help | Browse Help |
Context Sensitive Help Command | Select displays the context-sensitive help page based on the current right-side menu or topic. This is typically accessed by pressing the front panel Help key. Once enabled, a context-sensitive help page is displayed for each menu selected. • Front Panel Key: Help • Keyboard: ALT + 8, then 2 • MENU BAR | Help | Context Sensitive Help | User Interface Reference -or- Calibration & Measurement |
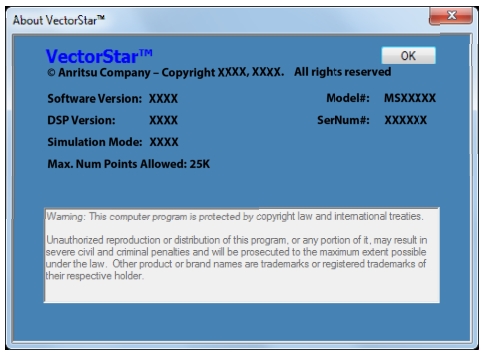
About VectorStar Command | Select displays the ABOUT VECTORSTAR dialog box with typical information as shown below. To access: • Keyboard: ALT + 8, then 3 • MENU BAR | Help | About VectorStar... The dialog box provides instrument configuration information. Click OK to close the dialog box. The following information is provided: • Copyright Statement • Software Version • DSP Version • Model # (Model Number) • SerNum# (Serial Number) • Simulation Mode – Either True or False, depending upon whether the application is being run in simulation mode on a PC (True), or on a VectorStar VNA (False). • Max. Num Points Allowed (Maximum number of points allowed in current mode) |