The VectorStar MS464xB Series VNA requires periodic cleaning of the cooling fan screen to prevent an obstruction that could cause overheating. Additional maintenance that may be required includes replacing a blown fuse, replacing the CPU backup battery, and cleaning the LCD panel.
Fuse Summary
The MS464xB contains six (6) fuses, four (4) external and two (2) internal.
External Fuses
There are two sets of rear panel fuses available for field replacement.
• AC Power Input Fuses
Two fuses located inside the IEC C14 AC Power Entry Module connector rated at T 6.3 A, 250 V.
• Bias Input Fuses
Two fuses, one per port, located inside the twist-off fuse holders rated at F 0.5 A, 250 V, quick acting.
Internal Fuses
Internal fuses are not replaceable in the field. They are mounted within the field-replaceable power supply module. Internal fuse information is provided for reference only.
• Internal Fuse #1
Rated at 6.3 A, 250 V, F (quick acting)
• Internal Fuse #2
Rated at 15 A, 32 VDC (automotive type).
External Rear Panel AC Input Fuses
The AC line fuses used in the VectorStar MS464xB Series VNA are 6.3A, type T fuses. The line fuse values are printed on the rear panel next to the power connector. Always use a new fuse of the type and rating specified by the fuse markings on the rear panel of the instrument. To replace the line fuses, refer to Figure: Replacing the Rear Panel Fuse and follow the procedure steps below.
Danger
Before changing the fuse, always remove the power cord from the power outlet. There is the risk of receiving a fatal electric shock if the fuse is replaced with the power cord connected.
1. Set the VectorStar MS464xB Series VNA to standby mode using the front panel Power button, and, at the back panel, turn the instrument off by using the AC Power Entry Module On/Off switch.
2. Disconnect the power cord from the rear panel power receptacle.
3. Using a small flat-blade screwdriver, carefully pry under the tab next to the rear panel power receptacle to open the fuse block cover and gain access to the fuse holder.
4. Slide out the fuse holder.
5. Replace the fuse in the fuse holder.
6. Install the fuse holder back into the rear panel fuse block.
7. Close the cover to secure the fuse holder in place. The cover will close with an audible snap.
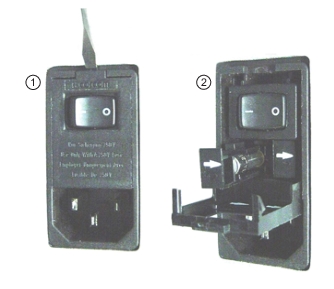
Replacing the Rear Panel Fuse
1. Opening the Rear Panel Fuse Holder with a flat blade screwdriver.
2. Sliding out and replacing a fuse.
8. Reconnect the analyzer to the power source and turn the back panel On/Off switch to on.
9. At the front panel, set the VectorStar MS464xB Series VNA to operate using the front panel Power button.
Bias Fuse Replacement
The required replacement Bias Port fuses used in the VectorStar MS464xB Series VNA are printed on the rear panel below the Bias Port Fuse Holders. Always use a new fuse of the type and rating specified by the fuse markings on the rear panel of the instrument. To replace the bias fuses, follow the procedure steps below.
Danger
Before changing the fuse, always remove the power cord from the power outlet. There is the risk of receiving a fatal electric shock if the fuse is replaced with the power cord connected.
1. Set the VectorStar MS464xB Series VNA to standby mode using the front panel Power button, and, at the back panel, turn the instrument off by using the AC Power Entry Module On/Off switch.
2. Disconnect the power cord from the rear panel power receptacle.
3. Remove any DC biasing from the DC Bias Inputs.
4. Using a small flat-blade screwdriver, unscrew the each Bias Fuse Holder.
5. Slide out fuse holder.
6. Remove the fuse.
7. Replace the fuse in the fuse holder.
8. Install the fuse holder back into the rear panel fuse block.
9. Lightly tighten the fuse holder with the flat-blade screwdriver.
10. Reconnect the analyzer to the power source and turn the back panel On/Off switch to on.
At the front panel, set the VNA to operate using the front panel Power button.