• Measurement: Measurement files contain all of the information in the setup files and the measurement data.
• Limit Lines: The Limit Lines file contains limit line data details.
• All: Displays all file types.
Note
If the USB memory stick is removed from the instrument port during file navigation, the navigation widow will automatically close. If there are two USB memory sticks attached to the instrument, they will be listed as USB0 and USB1 on the drop-down list.
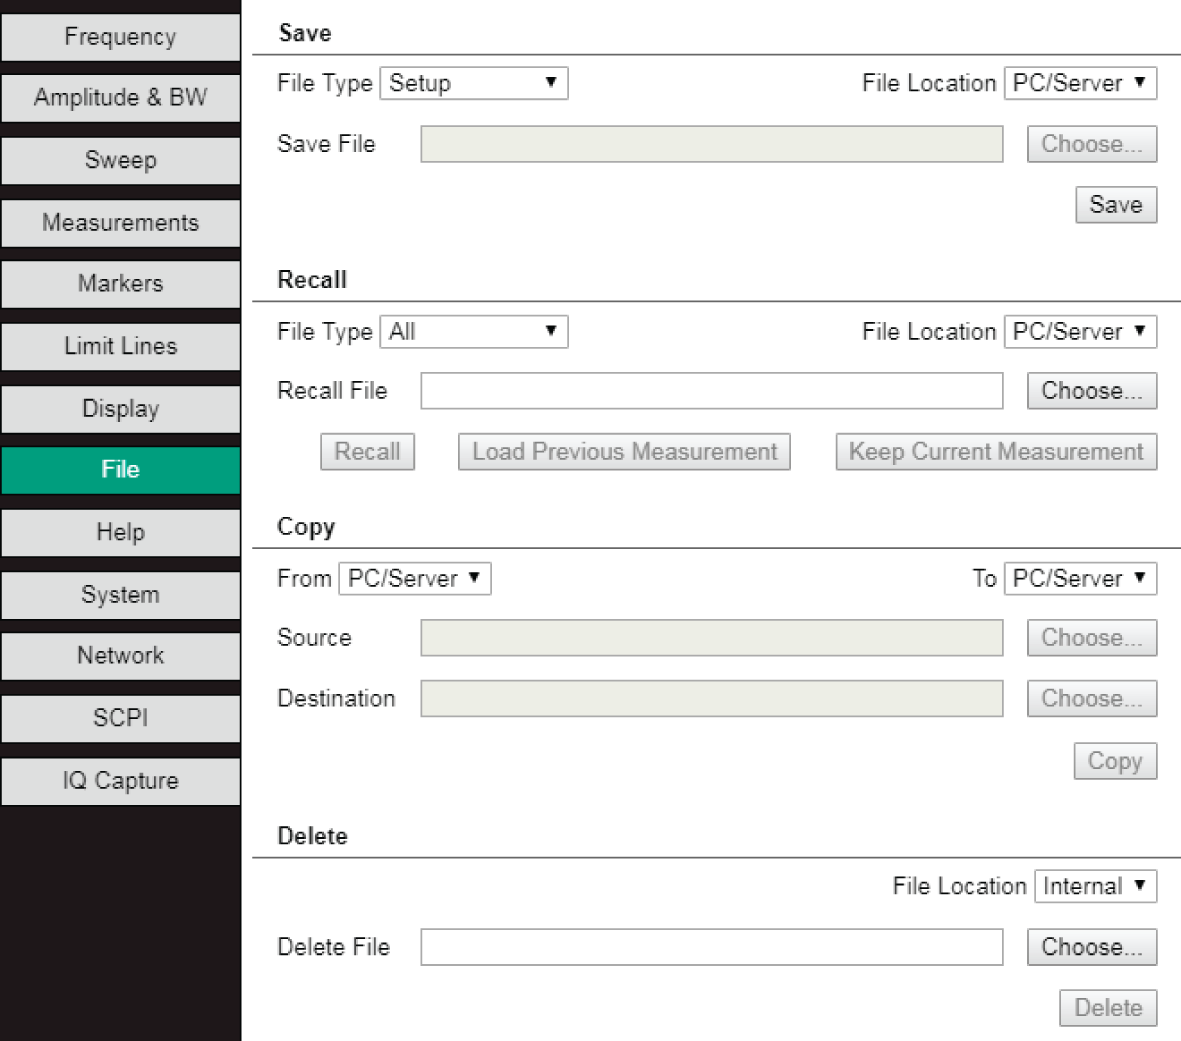
Save
1. Press the drop-down arrow for File Type to display the list of file types - Setup, Measurement, and Limit Lines.
2. Select the desired file type.
3. Press the drop-down arrow for File Location to select the destination location to save the file - PC/Server, Internal, or USB0.
4. Select the destination location. If PC/Server is selected, the Save File entry window will be grayed and inactive. The file will be placed in the Download folder of the PC when saved.
5. Press Save. The file is saved to the destination folder.
Copy
1. Press the drop-down arrow for From to select the source location of the file - PC/Server, Internal, or USB0.
2. Select the desired source location.
3. Press the drop-down arrow for To to select the destination location of the file - PC/Server, Internal, or USB0.
4. Select the destination folder. If PC/Server is selected, the Save File entry window will be grayed and inactive. The file will be placed in the Download folder of the PC when copied.
5. Press the Choose button for Source.
6. In the Source File dialog, navigate to the file and press Choose.
7. Press the Choose button for Destination.
8. In the Destination File dialog, navigate to the folder and press Choose.
9. Press Copy. The selected file is copied from the designated source folder to the designated destination folder.
Note
You cannot copy a file from PC/Server to PC/Server. The Source, Destination entry windows and the Copy button will be grayed and become inactive.
Recall
1. Press the drop-down arrow for File Type to display the file types - All, Setup, Measurement, Limit Lines.
2. Select the desired file type.
3. Press the drop-down arrow for File Location to select the source location for the file - PC/Server, Internal, or USB0.
4. Select the source location.
5. Press Choose for Recall File.
6. In the Recall File dialog, navigate to the desired file and press Choose.
7. Press Recall. The selected file is recalled.
After recalling a measurement, you can continue real-time measurements using the settings of the measurement just recalled or return to the measurement settings before the measurement recall was performed. Press either of the two buttons to select the desired real-time mode - Load Previous Measurement and Keep Current Measurement.
• Load Previous Measurement: Press this button to load the measurement settings that were in use before the Recall measurement process was executed. The unit returns to real-time measurements using those settings.
• Keep Current Measurement: The unit returns to real-time measurements using the settings from the “recalled measurement”.
You can also return to the real-time measurement settings that were used before executing Recall measurement by clicking the System Preset button in the System panel.
Delete
1. Press the drop-down arrow for File Location to select the source location for the file - Internal or USB0.
2. Select the source location.
3. Press Choose for Delete File
4. Navigate to the desired file or folder in the Delete File Or Directory dialog and press Choose.
5. Press Delete. The file or folder will be deleted from source location.