 |
|
ICON | Description |
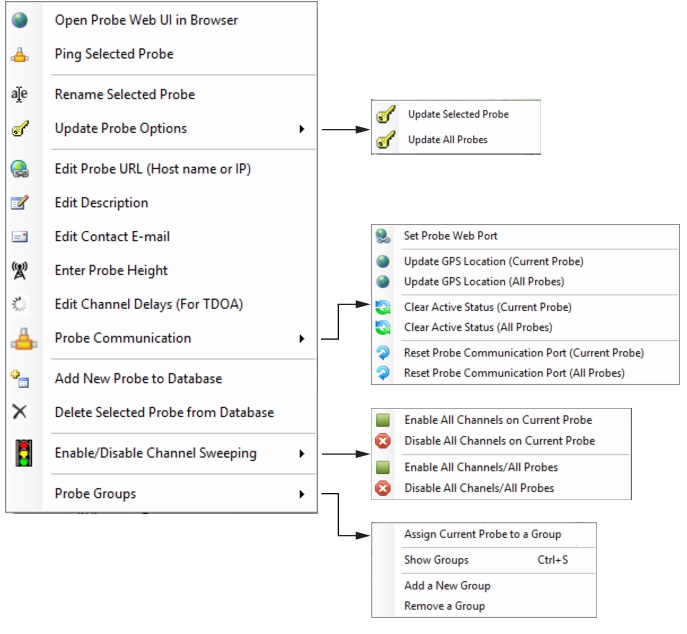
 | Open Probe Web UI in Browser Opens the Installed Web Browsers dialog to choose either Google Chrome or IEXPLORE.EXE. |
 | Ping Selected Probe Establishes communication with the monitor. The Vision Ping dialog opens displaying the reply information from the monitor. |
 | Rename Selected Probe Opens the Edit Base Station dialog to change the label of the selected monitor. Enter a new name in the entry box. |
 | Retrieve and Update GPS Location Does an immediate query to the monitor for updated GPS location. |
 | Update Probe Options Click to update any changes in options. A dialog will pop up stating: • Update Probe – Updates and lists the probe being updated. • Update All Probes – Displays dialog describing which probes have been successfully updated or will list which probes have not been updated. |
 | Edit Probe URL (Host name or IP) Opens the Edit Base Station URL dialog to change the URL of the selected remote spectrum monitor. Enter a new URL in the entry box. |
 | Edit Description Opens the Edit Base Station Description dialog to change the description of the selected remote spectrum monitor. Enter a new description in the entry box. |
 | Edit Contact E-mail Opens Edit Base Station Contact dialog to add or change the e-mail address to those monitoring this base station. Add or change the e-mail address in the entry box. |
 | Enter Probe Height Opens the Probe Height dialog to add or to change the height location of the selected remote spectrum monitor. Enter the new height in the entry box. Units are in meters. |
 | Edit Channel Delays (For TDOA) Opens a User Interface for entering channel delays. 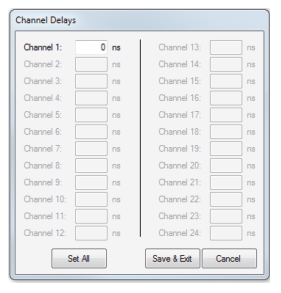 |
 | Probe Communication Click a menu: • Set Probe Web Port: Opens the HTTP port # dialog. Enter the HTTP port number for this remote spectrum monitor. If assistance is needed in obtaining this port number, contact the person setting up the network for remote spectrum monitoring. • Update GPS Location (Current Probe) • Update GPS Location (All Probes) • Clear Active Status (Current Probe) • Clear Active Status (All Probes) • Reset Probe Communication Port (Current Probe) • Reset Probe Communication Port (All Probes) |
 | Clear Active Status A target receiver in use sets an internal flag that marks the target receiver as busy and is cleared when not in use. Users should not attempt to use the target receiver for measurements until the flag is cleared. There may be times when a process fails to clear the Active flag and the target receiver will report as busy until the flag is cleared. When no users are accessing that target receiver, use this menu option to clear the Active flag so that the target receiver can be accessed freely. |
 | Reset Probe Communication Port Reset the Ethernet port using this menu option. Note: If someone is using the target receiver to perform a long term measurement, the SCPI port will appear blocked; therefore this function can corrupt someone else’s measurement. A symptom of a blocked SCPI port: The target receiver interface is displayed in browser view, but no measurements/sweeps are shown. |
 | Add New Probe to Database The Create New Base Station dialog opens to enter information for the new database. Fill in the entries and click OK. The new monitor is listed on the Base Station and Channel Directory. |
 | Delete Selected Probe from Database Allows you to delete a base station from the directory. |
 | Enable Sweep on All Channels / Disable Sweep on All Channels Click a menu: • Enable All Channels on Current Probe • Disable All Channels on Current Probe • Enable All Channels/All Probes • Disable All Channels/All Probes Enables data collection for each channel on a monitor. This can be done one at a time by clicking on the 'Unlock sweep parameters' check box, then checking the check box for 'Automatically monitor this channel'. Enable Sweep on All Channels is a quick way to do all channels on a monitor at once, rather than the tedious process of enabling each separately. Disables data collection for all channels on a monitor. This can be done one at a time by clicking on the 'Unlock sweep parameters' check box, then clearing the check box for 'Automatically monitor this channel'. Disable Sweep on All Channels is a quick way to do all channels on a monitor at once, rather than the tedious process of disabling each separately. |
Probe Groups | Probe Groups Click to open the groups submenu. Click the appropriate command shown below: • Assign Current Probe to a Group: Add a probe to a group. • Show Groups: Display the list of groups. • Add a New Group: Add a new group to a current list or start a new group. • Remove a Group: Remove a group of probes from the list. Monitors can be assigned into groups. Groups are used only to visually arrange the monitors so that associated monitors are together in the monitor list. By default, the monitors are listed in the order they are entered into the database. To place the monitors in groups, use the monitor context menu to add and assign groups. You also must toggle the Show Groups setting on to see the grouped monitor list. Individual groups can be collapsed or expanded to easier view just the monitors that are of interest at a particular time. For more on probe groups, see Base Station (Spectrum Monitor) and Channel Directory. |