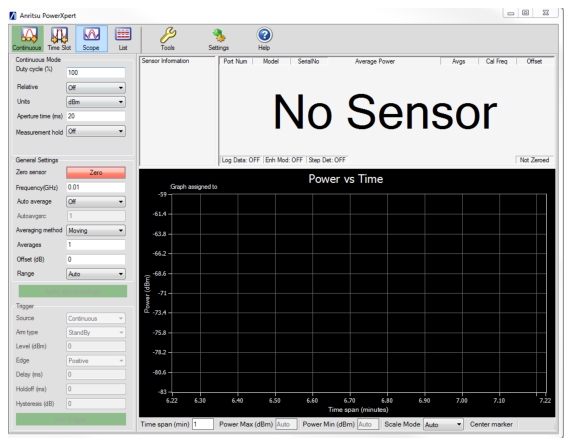
 |
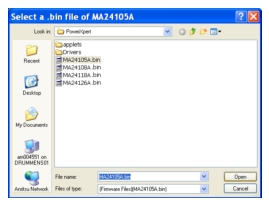
Warning | Before launching the firmware upgrade utility, make sure that you have the sensor firmware file available. Failure to complete the firmware installation will render the power sensor inoperable. Earlier versions of the MA24108A and MA24118A power sensors used an Atmel upgrade driver. This driver must first be uninstalled from the USB devices listed in Windows Device Manager before upgrading the firmware. See Removing Old Upgrade Driver. |
Note | If for any reason the sensor becomes stuck in upgrade mode, the message “Found a sensor in Upgrade mode, click here to Upgrade or Restore.” (Figure: Sensor in Upgrade Mode Indication) appears on the PowerXpert window. Click on the message to continue the upgrade or to restore the sensor to its original firmware state. Follow the instructions below starting at Step 7. |
|
 |
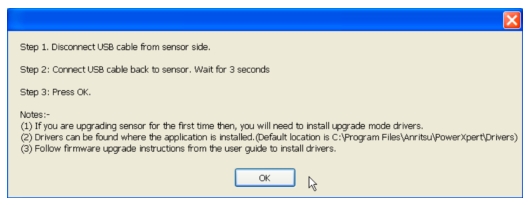 |
Note | If this is the first time you are upgrading the sensor’s firmware, the power sensor upgrade driver must first be installed. In this case, the Windows Found New Hardware wizard automatically starts so the driver can be installed before the firmware upgrade continues. Install the driver before clicking OK in the dialog box shown above in Figure: Firmware Upgrade Dialog. If OK is clicked before the driver is installed, the COM port of the sensor will not be enumerated in the upgrade utility and the upgrade cannot proceed. When this happens, disconnect the USB cable from the sensor, close and restart the PowerXpert application, then reconnect the sensor. The message shown in Figure: Sensor in Upgrade Mode Indication will appear. Follow the instructions in the message to resume the upgrade. The power sensor upgrade driver installation is similar to the power sensor driver installation detailed in Installing Power Sensor Drivers except that the sensor will be identified as “Anritsu Sensor Upgrade Driver”. The system should automatically find the driver and install it after a warning. Windows 7 operating system: the “Anritsu Sensor Upgrade Driver” is referred to as “GPS camera detect” by the OS because of a conflict in the driver. The SAM-BA functionality remains unaffected. If the upgrade driver has already been installed, go to Step 7 to continue firmware upgrade. |
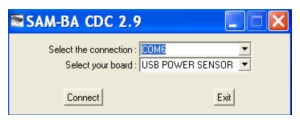
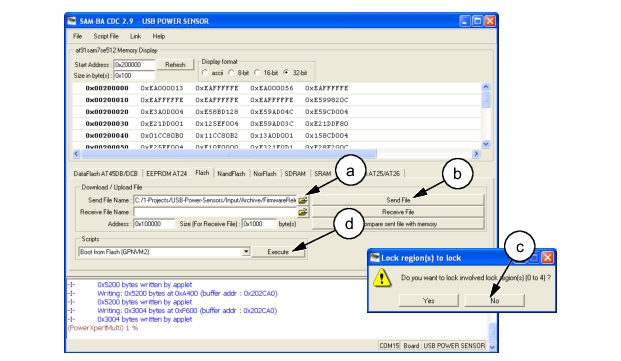
Note | If the SAM-BA firmware upgrade utility does not start automatically, start it from: C:\Program Files\Anritsu\PowerXpert\SensorUpgradeUtility.exe |
Note | The SAM-BA firmware upgrade utility requires that the serial ports between COM2 and COM49 be used. You can find out the COM port number by going to: Start | Settings | Control Panel | System | Hardware | Device Manager | Ports (COM & LPT). If the assigned COM port for the “Anritsu Sensor Upgrade Driver” is COM50 or greater, then the COM port number must be reassigned to less than COM50 and the SAM-BA firmware upgrade utility must be relaunched from C:\Program Files\Anritsu\PowerXpert\SensorUpgradeUtility.exe. Refer to USB/Serial Port Compatibility for additional information. |
 |
 |
Note | If the sensor is stuck in the Upgrade mode and you are returning it to its original firmware state, in the next step click on the “Execute” button only. |
 |