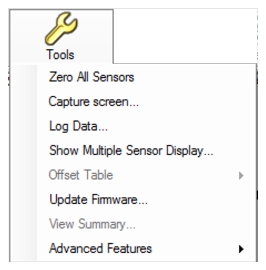
The Tools menu provides the option of zeroing all sensors, capturing the PowerXpert screen display, enabling the log data. The grayed out selections are not available with the MA245xxA Power Master, but become available when a MA24208A, MA24218A, MA24330A, MA24340A, or MA24350A power sensor is connected and selected.
Tools Menu
Zero All Sensors
Note
The MA245xxA Power Master does not require to be Zeroed; therefore, Zero All Sensors is grayed out. But when the MA24208A, MA24218A, MA24330A, MA24340A, and the MA24350A USB power sensors are connected, the Zero All Sensors feature will become active. See Zero Sensor
Zero All Sensors provides a convenient method of zeroing all connected power sensors. Zero the MA24208A, MA24218A, MA24330A, MA24340A, and the MA24350A sensors before making power measurements. Zero All Sensors becomes active when a MA24208A, MA24218A, MA24330A, MA24340A, and / or a MA24350A is connected and selected from the Zero Sensor or Multiple Sensor Display.
If frequent low-level measurements are being made, it is advised to often check the sensor zeroing to assure accurate measurements. Before zeroing the sensor, connect it to the DUT (device under test) test port and remove RF power from the connection to a level 20 dB below the noise floor of the power sensor. Leave the sensor connected to the DUT test port so that ground noise and thermal EMF (electro-magnetic fields) are zeroed out of the measurement. The sensor may also be connected to a grounded connector on the DUT.
Capture Screen
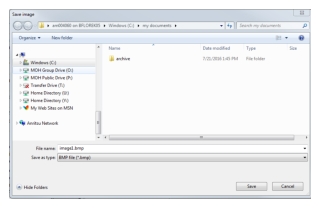
The Capture Screen utility captures a PowerXpert screenshot and displays the Save image dialog. Save the image in BMP, JPEG, PNG, or GIF file formats.
Save Image Dialog
Log Data
The Log Data feature records data in a comma separated value file and is accessed from the Tools | Log Data toolbar. This feature is available only when the application is in Continuous Average mode. Data logging is set up in the dialog below:
Log Data Dialog
• Interval Setup: Sets full speed data or fixed interval data logging (user defined logging interval). When Full Speed is selected, the user must manually start and stop the logging function.
• Log Interval (sec.): Sets the time interval in which to log data and is available when Full Speed is deselected.
Note
Log Interval should be set to reduce the number of data points when capturing long time periods as Microsoft Excel has a limitation of data records.
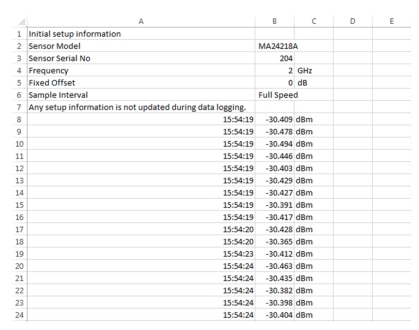
Data is stored as comma separated value (.csv) files that can be directly opened in Microsoft Excel. The filename and location can be selected or changed as desired. The default filenames have the following format:
Test_yyyy_mm_dd_hhmmss.csv
where:
• yyyy: Four-digit year
• mm: One- or two-digit month
• dd: One- or two-digit day
• hhmmss: Two digit hours (24-hour clock), minutes, and seconds
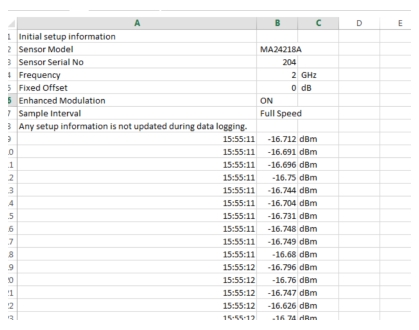
Sample log data is shown in a Microsoft Excel spreadsheet file below:
Log Data Enhanced Modulation On
Data logging is stopped by accessing the Tools | Log Data toolbar and pressing Stop in the Log data dialog.