 |
 |
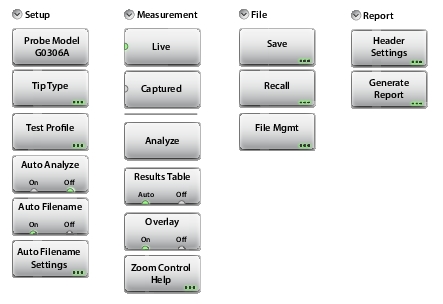
 | Probe Model This submenu key shows the currently selected probe model. Press the key to display the list of supported VIP models from which you can select. Tip Type Press this submenu key to display the Tip Type selection box. Use the rotary knob or the Up/Down arrow keys to highlight the appropriate probe tip, then press Enter to save the setting. See Table: Probe Tip Types for a list and description of possible selections. To close the Tip Type dialog without making a change, press the Esc key. Test Profile Press this submenu key to select a profile that matches the type of fiber being tested. Use the rotary knob or the Up/Down arrow keys to highlight the appropriate probe tip, then press Enter to save the setting. See Figure: VIP Test Profile Selection Box. Auto Analyze On/Off When set to On, the fiber endface image is automatically analyzed following capture. Select Auto Analyze Off if you want to view the image before manually executing the analysis. Auto Filename On/Off If Auto Filename is On, the file naming scheme currently defined in the Auto Filename Settings dialog is applied when you press the Save icon. With Auto Filename Off, pressing the Save icon opens the Save dialog the same way as pressing Save under the File menu would. Auto Filename Settings Press this submenu key to open a dialog box where you can preset the location and name of files to be saved. See Figure: Auto Filename Settings Dialog. You can define a prefix (VIP is the factory default) and set the starting number from which file numbering will increment. You may also choose to include the current date in the file name, in the format DDMMYYY. For example: VIP_0001.vipi VIP_21082015_0001.vipi |
 | Live In Live mode, the instrument displays a live view of the connector endface. Use the control on the probe to adjust the focus. The image cannot be panned or zoomed until it is captured. Captured Press this submenu key to capture the currently displayed image, which you may then zoom and pan, using the rotary knob and arrow keys. The message “File Not Saved” is displayed at the top of the screen until you save the image and/or the measurement results. Analyze Press this submenu key to start analysis of the VIP image. The overall Pass/Fail result is displayed in the lower left corner of the screen. If the Results Table setting is Auto, a table showing detailed results of the VIP test is also displayed. Results Table Auto/Off This submenu key toggles on and off the table of detailed VIP test results. When set to Auto, the table will appear only when there are analysis results to display. Overlay On/Off Press this submenu key to turn on and off the colored circles showing the analysis areas and to highlight any scratches and defects on the connector endface: Green – Unimportant scratches and contaminations Red – Serious scratches and contaminations that may impact signal quality Zoom Control Help Press this submenu key to display a Help message with instructions on how to zoom and pan the image. Press Dismiss to close the message box. |
 | Save Press this key to open the Save dialog (Figure: Save Dialog Box). This function is the same as pressing the keypad menu key Save (7). You can choose to save the VIP image and analysis results, the VIP image alone, or the current display screen. See Figure: VIP File Type. Recall Press this submenu key to open a previously saved VIP measurement file (.vipi extension) or VIP image (.png extension). Refer to Recall a VIP Measurement (VIP Mode Only). Note that a captured screen shot of the display cannot be recalled and analyzed. File Mgmt Press this submenu key to display the File Mgmnt Menu. This menu contains basic file management functions including renaming files or folders, creating folders, copying, pasting, and deleting files or folders. Many of the file management functions are duplicated in the Save and Recall menus for user convenience. |
 | Header Settings Press this submenu key to enter or change report header information. Refer to VIP Reporting. Generate Report This submenu key opens the Generate Report dialog, where you can enter the report name, select the destination location, and select what data to include: Analysis Results – Overall Pass/Fail result Analysis Details – Detailed results by analysis area Current Results – Image and analysis results of currently displayed VIP measurement Additional VIPI Files – Previously saved measurement data |