The VectorStar MS464xB Series VNA supports Ethernet 10/100 BASE-T. The instrument is connected directly to the LAN via the rear panel RJ-45 Ethernet Port using a standard CAT-5 Ethernet cable. The MS464xB Series VNA VNAs can also be controlled remotely across a Universal Serial Bus (USB) Type 2 network by a PC equipped with a USB control application using the rear panel USB Control Port.
Default Plug-and-Play Configuration
The VectorStar MS464xB Series VNA and its Windows operating system comes pre-configured and ready to plug into and connect with an existing Ethernet or USB network. The Ethernet network must provide DNS/DHCP and be configured with a gateway. USB networks are typically auto-detecting without the need for configuration; however, a special USB network cable (described in the note below) is required.
Note
The required PC-to-Instrument USB 2.0 networking cable (also called a USB-USB cable, USB networking cable, or USB bridge cable) has a small electronic circuit module in the middle of the cable that allows the PC and the VectorStar VNA to talk to each other at 480 Mbps. The PC-to-Instrument USB cable is user-provided and does not come with the VectorStar MS464xB Series VNA VNA.
Using the wrong type of USB-USB cable can result in damage to the PC and/or VectorStar USB ports and/or power supplies. Do NOT use a so-called “USB A / A” cable that is similar to a serial port cross-over null-modem cable.
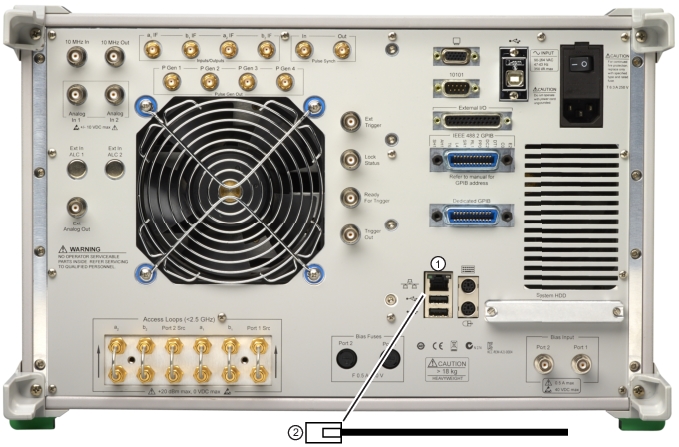
Connect the VNA to the network with an Ethernet cable between the VNA rear panel RJ-45 Ethernet Port and your local network port or a USB network cable between the VNA rear panel USB Type 2 Port and your local network hub.
VectorStar MS464xB Series VNA Ethernet and USB Ports
1. Rear Panel Ethernet Port (at top) and USB Ports (at bottom).
2. Matching USB or Ethernet Connection Cable.
The VectorStar MS464xB Series VNA has one Ethernet RJ45 (f) connector and two (2) with USB 2.0 Type A port connectors. There are two additional USB 2.0 Type A ports on the instrument front panel. Use the Ethernet port to connect to a LAN (Local Area Network). Windows will automatically detect the network settings and configure the network connection.
Manually Configuring TCP/IP Ethernet LAN Settings
Note
This section is provided for general information about manually configuring an Ethernet connection and does not apply to USB networking. Consult your local network administrator for the exact requirements and settings that are required for your network installation.
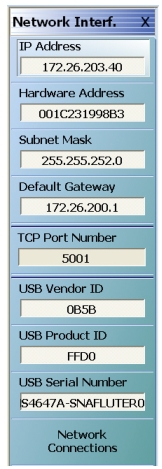
To see the current network settings for your VectorStar MS464xB Series VNA, with the VectorStar Application Software running, navigate to the NETWORK INTERF. (Network Interface) menu as follows (see Figure: NETWORK INTERF. (NETWORK INTERFACE) Menu):
• MAIN | System | SYSTEM | Ntwk Interface | NETWORK INTERF.
The detailed description of the menu, its operation, and connected dialog boxes are described in the User Interface Reference Manual.
NETWORK INTERF. (NETWORK INTERFACE) Menu
The top eight (8) display buttons provide information for the current network settings. Changes to these settings must be made through the Microsoft Windows configuration utilities by clicking Network Connections.
The Network Connections dialog box shows the current available local networks.
Note
You may need to consult your network documentation or network administrator for assistance in manually configuring your network setup. The Windows network connections Help may provide information related to computer networking.