The power-on procedure involves connecting the instrument to AC Mains, using the back panel AC Power Rocker Switch to turn the instrument on, and then using the front panel Standby/Operate key to toggle the instrument into operate mode. The power-off procedure involves using the front panel Standby/Operate key to toggle the instrument into standby mode, and then using the back panel AC Power Rocker Switch to turn the instrument off.
During the transition from operate to standby, first the green Operate LED blinks and then the orange Standby LED blinks. Finally, the Standby LED stops blinking and goes into a steady state of illumination.
Note
Do not turn the instrument off or unplug it while it is changes from standby to operate, or from operate to standby.
Do not turn the instrument off or unplug it when it is in operate mode.
Doing so may cause the Windows application to improperly close.
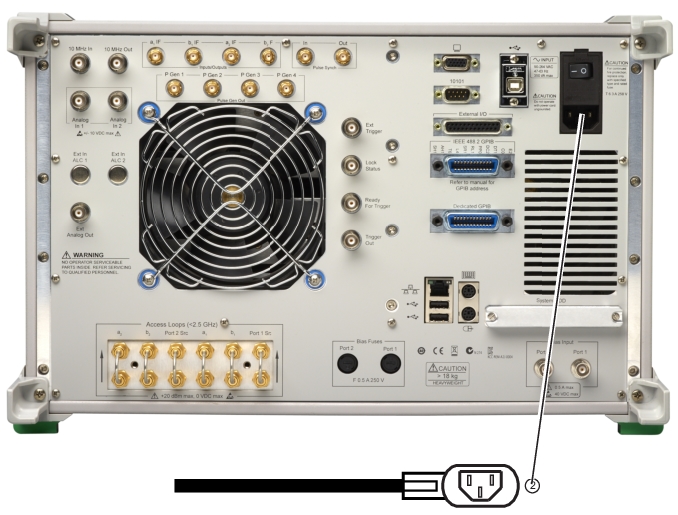
Rear Panel Power Connection to AC Mains Power
1. The AC Power Entry Module contains the rear panel AC Power Rocker Switch (at top) and the IEC C14 AC Power Socket (m) (at bottom).
2. The AC Mains Connection is made with an AC Input Cable connected to local AC mains power at one end and to the instrument using the IEC C13 AC Line Socket at the other end.
Procedure – Power-On to Standby Mode
To turn the instrument on:
1. Connect the supplied AC power cord to local AC mains power.
2. Connect the other end of the power cord to the rear panel IEC C14 Chassis AC Power Socket located in the upper right corner of the rear panel.
3. Switch the instrument on by changing the AC Power Rocker Switch to “|” (or ON). The orange Standby LED illuminates. The instrument is now in standby mode.
Note
Whenever the VNA is not being used, it should be left connected to the power source and placed in standby mode. This keeps the internal time-base frequency reference at the correct operating temperature.
When the instrument is in standby mode, it is safe to turn it off from the rear panel AC Power Rocker Switch.
After turning off the instrument, you must wait at least 15 seconds before turning the instrument back on again. This delay is required to allow the internal power supplies to discharge and to assure a reliable cold start.
Procedure – Standby Mode to Operate Mode
To set the instrument to operate mode:
1. Press and hold the front panel Standby/Operate key for at least one second. The orange Standby LED turns off and the green Operate LED illuminates. The VectorStar VNA information splash screen is displayed during the change to operate mode process and is shown below in Figure: VectorStar MS464xB Series VNA Startup Splash Screen.
Note
The VectorStar MS464xB Series VNA requires at least two minutes to load the system software and perform a series of internal calibrations. The system uses a self-test to check all sub-systems for proper operation and download firmware into the various peripheral devices.
When the instrument is in operate mode, do not use the rear panel AC Power Rocker Switch to turn off the instrument nor disconnect the instrument from the AC power. Doing so will cause the Windows application to close improperly.
When placing the VectorStar MS464xB Series VNA in operation, allow at least 90 minutes of warm-up time in the operate mode before using the VNA to assure stable operation and the highest possible accuracy.
VectorStar MS464xB Series VNA Startup Splash Screen
Procedure – Operate Mode to Standby Mode
To set the instrument to standby mode from operate mode:
1. Press and hold the front panel Standby/Operate key for at least one second. The green Operate LED blinks and then the orange Standby LED blinks. The instrument switches from operate mode to standby mode.
2. When fully in standby mode, the orange Standby LED is illuminated and is not blinking.
Note
Do not disconnect the instrument from power nor turn off with the AC Power Rocker Switch while the instrument is changing from operate mode to standby mode.
Procedure – Standby Mode to Power-Off
To turn the instrument off:
1. Make sure that the instrument is in standby mode. The orange Standby LED should be illuminated and not blinking.
2. Turn off the instrument by pressing the “O” (or OFF) on the rear panel AC Power Rocker Switch.
3. If necessary, the instrument can now be disconnected from the AC power mains.
Note
After turning off the instrument, you must wait at least 15 seconds before turning the instrument back on again. This delay is required to allow the internal power supplies to discharge and to assure a reliable cold start.