Icon | Description |
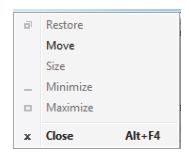
Anritsu - Vision Acquire This icon is located at the top-left corner of the Source Locator GUI screen. Click it will provide the GUI display screen-view sizing and positioning choices.  • Restore: Resets the GUI display to the default view. This selection is active only after Maximize has been selected and the GUI screen is in a full screen mode. Restore is normally grayed and only becomes available after Maximize is active. • Move: Click and move the GUI display screen. • Size: Click a corner of the GUI display and resize the display by dragging the corner. • Minimize: Minimizes the screen to the bottom tray, but the remains active. Click it from the tray to view the GUI display. • Maximize: Changes the GUI screen to full size. • Close: Closes the GUI screen display. | |
 | Sweep Probes Start the collection of traces to the database. Data collection can be stopped from "Vision Acquire System Tray Menu". Go to system tray and right-click on the Vision Acquire icon, Vision Acquire menu pops up providing an option to stop data collection. A report titled Vision Monitor Failure and Status Report is generated and placed in the default browser. |
 | Sweep Probe Time Setting Click this number box to set the data collection period from 1 hour to minutes, or seconds. Scroll down the list for the desired time or click the up/down arrow to the desired time. Click one of the timing options from the list. Alternative time intervals are not allowed. |
Email Notifications Window Setup the email configuration before this will become active. For details on setting up email notifications, refer to Setting Up Email Notifications. Click on the + sign to add email address and check boxes to set notification period. | |
Open File Folder Browse and open a file. | |
 | Help Open the Acquire program and help file. |
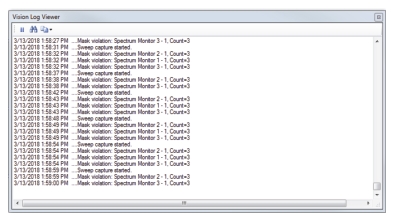
 | View Log Opens the Vision Log Viewer user interface screen that contains the activity between the Vision Acquire software and the remote spectrum monitors. If opened when a sweep is occurring, real-time data can be viewed as shown below. |
 | Archive Save the current database to a different directory location. Click to open the Browse For Folder dialog. Click a folder or Make a New Folder to place the archive database. Click OK. This makes a copy of the active database, but new traces are still added to the old database. |
 | Compress Compresses the data in the database file. It removes the unused space created by the deletion of old traces from the database. If Vision software seems to be running unusually slow, compacting the database may be necessary. |
 | Trim Removes old traces from the database immediately. Does the same thing as the Automatically remove old traces check box, except without waiting. The “trimmed” database is also compressed. |
Database Path Displays the directory location of the current database. Click the folder to enter a different database. This will not create a new database, but will point Vision Acquire to a different existing database for future data storage. | |
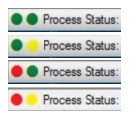
 | Probe Process Status Indicator The Probe Process Status Indicator bar provides a visual indicator of the Vision Acquire UI to indicate if a probe is off-line or in use. The Process Status indicator descriptions are as follows: • Green, Green: All remote probes are on-line and available. • Green, Yellow: All probes are on-line, but one or more is occupied by another user. • Red, Green: One or more remote probes are currently off-line, but all the probes that are on-line are available. • Red, Yellow: At least one probe is off-line, and of the probes that are on-line, at least one of the remote probes is occupied by another user. |
 | Sweep Once Makes an immediate single sweep of the remote spectrum monitors. |
